You are currently browsing the tag archive for the ‘grilled’ tag.
While shopping at Costco (don’t you just love that store?) last weekend, we happened to see a package of frozen bison steaks. They were about the same price as the pre-packaged Costco steaks we had picked up already, so we decided to give them a try instead. They came individually wrapped in six ounce portions, which was really convenient since we do that on our own with all the meat we buy there anyway. (On a side note, if you’ve never bought meat from Costco, it’s a really good deal. They have quality meat in large packages for cheaper than traditional grocery stores, a perfect way to stock your freezer for a few weeks.) After getting home and replenishing our freezer, we got to thinking about our menu for the week and made sure to include the bison steaks.
We prepared them just like a regular steak, right on the grill for ten or so minutes (depending on how you like your meat cooked), but we seasoned pretty lightly to let the flavor of the meat really shine. We have a few more steaks, so maybe the next time we make them we’ll be a little more brave and try something creative. Suggestions from anyone who eats gamey meats?
Here’s what you’ll need:
Serves: 2
– 2 6 oz. bison steaks
– garlic powder
– salt and pepper to taste
(- for more flavor you can add steak seasoning or any other seasonings you like)
I’m not a fan of rare meat, but I know when it comes to specific meats and cuts, it’s best to prepare them as close to the rare side as you can handle them. I usually eat my steaks medium to medium-well, but told Billy (AKA, the grill master) to cook the bison to whatever he thought would be best. He came in off the grill with a pretty medium steak for me, and a medium-rare for himself. I thought mine was perfect, but he insisted that his was even more perfect. Either way, medium to medium-rare seems like a safe bet for this particular cut of bison.

Bison Steaks with Mashed Potatoes
I have never had such a tender cut of meat before. The bison just melted in my mouth with each bite. And even though we didn’t go crazy with the seasonings, the steaks were full of flavor. I didn’t taste much of a difference compared to regular steak, the bison just had a hint of a gamey taste. We served the steaks over mashed potatoes and the perfect bite, in my opinion, was a marriage of bison and potatoes. Every “meat and potatoes” person reading this blog has to go find themselves some bison steaks and try this. Enough said. Period.
Do you ever grill chicken and think that it’s just missing some flavor? When it comes to grilling meats, sometimes it seems like there’s only a few flavor options. The first person that comes to mind when trying to solve a grilling dilemma is Bobby Flay. But that’s not where we turned for this delicious grilled chicken recipe. From now on, I think it’s going to be difficult to have grilled chicken without Tyler Florence’s garlic-herb dressing.
Here’s what you’ll need:
– 1 or 2 heads garlic, cut in half horizontally
– salt and pepper
– 1/2 cup olive oil, plus 2 tbsp
– 2 whole thyme springs, plus the leaves from 6 sprigs
– the juice of 2 lemons
– 1 small bunch fresh parsley
– 1 whole chicken (or any combination of chicken pieces you prefer), cut into 10 pieces
Before you can do anything with this recipe, you have to roast the garlic. This is going to take at least 30 minutes, so make sure you account for the extra time it takes to get everything prepared. Preheat the oven to 400 degrees. To roast the garlic, place the halved head(s) face-up on a large piece of aluminum foil, drizzle with olive oil, sprinkle with salt and pepper and add two whole thyme sprigs to the top. Fold up the aluminum foil to make a little packet and throw in a 400 degree oven for 30 minutes, or until the cloves are golden brown and soft.
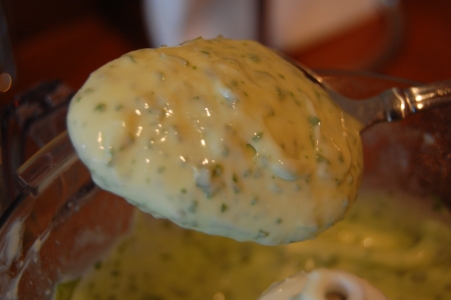
Once the garlic is done, squeeze all the cloves out of the skin into a food processor. Also add the olive oil, lemon juice, thyme, and parsley and puree until you get a smooth, thick vinaigrette-type dressing. Now you’re ready to grill! About halfway through the cooking (after about 20 minutes) start basting the chicken with the dressing. The outside of the chicken will caramelize a little and get a result in a great crusty, crispy skin.

Tyler's Ultimate Grilled Chicken with Mashed Potatoes and Sauteed Cabbage
This was seriously the best grilled chicken I have ever had in my life. Once we took it off the grill, we added a little more of the dressing for an added flavor boost. I’m not sure that it needed it, but it sure made it tasty! The flavors of the garlic, lemon and herbs really came through in every bite of chicken…not just the skin (although the skin was the best part). The skin was nice a crispy, but not burnt, and the meat was nice and tender and juicy. I said it last time we made a Tyler Florence recipe and I’ll say it again — it’s called Tyler’s Ultimate for a reason! The deliciousness of this chicken is unexplainable. Period.
You can find the recipe in Tyler’s latest book, Tyler’s Ultimate, or on the Food Network Web site. And I highly recommend you find the recipe and try it out. You won’t be disappointed!
Apparently we’ve been in a grilling mood. I guess we’re trying to catch up on all the grilling we didn’t do over the summer. At least the weather is still good. It takes a pretty good chef to be able to call your dishes “the ultimate,” but I think Tyler Florence has the chops. His book, Tyler’s Ultimate, has “the ultimate” recipe for everything. Let me tell you, his grilled shrimp with lemon-basil butter stuffing were amazing.
Here’s what you’ll need:
– 1 stick butter, softened (make sure it’s not melted)
– a large bunch of fresh basil
– the juice of 1 lemon
– salt and pepper
– 16 large jumbo shrimp, shells on and split down the back
This recipe is really easy, but it takes some time to individually stuff each shrimp. We ended up with a really good system where one of us would put a drop of butter under each shell and the other would rub it around a bit. However it gets done, make sure you’re not shy with the butter because it gives the shrimp so much flavor. To make the butter, throw the softened stick, basil, lemon juice and salt and pepper into a food processor and puree until smooth. Stuff the butter under the shells of the shrimp, about a half a teaspoon for each shrimp.

Lemon-Basil Butter
Heat the grill over medium-high heat and spray with cooking spray so the shrimp don’t stick. Once the grill is hot, throw the shrimp on and don’t touch until they’re ready to flip, about three minutes. Baste them with more butter as they begin to cook, then flip. Baste again and let them cook through, about another three minutes. Simple as that!

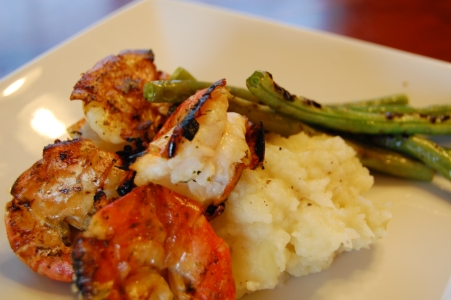
The Ultimate Shrimp with Mashed Potatoes and Green Beans
Leaving the shells on the shrimp while they’re grilling gives them so much extra flavor, but nothing can top the amazing flavor from the lemon-basil butter. The shrimp had such a buttery flavor, but the flavors of the lemon and basil resonated throughout the meat of the shrimp. I’ve had grilled shrimp before, but there’s no doubt that these are truly the ultimate grilled shrimp.
Well, sort of. Over the weekend, we found this smoke box attachment type thing made for a regular gas or charcoal grill that basically gives you all the great flavors of smoked food without the smoker. (There are other ways of doing this, such as cooking your food directly on a wood plank, but we had never seen a box made for wood chips.) The box is pretty small, about 10 inches long and one or two inches deep, but it fits right in between the burners on a gas grill. You fill it with wood chips that have been soaked for at least 30 minutes, set it on a pre-heated grill and let it heat up until the chips start to smoke. It’s really simple to use and the salmon came out extra delicious.

Apple Wood Chips in the Smoke Box
We used apple wood for our Atlantic salmon fillet (at the recommendation of Bobby Flay). We soaked the chips for 30 minutes in a cup with another cup set on top to hold them down. While the chips were soaking, we seasoned the salmon with salt, pepper, garlic powder and lemon zest and rubbed in a thin layer of olive oil so the fillet wouldn’t stick to the grill. Billy pre-heated the grill, I drained the wood chips and put them in an even layer in the smoke box then placed the box in between two burners on the grill. With the grill closed, the wood chips began to heat up and started smoke away. After about 10 minutes we could smell the apply goodness…it was time to put the salmon on the grill! Billy put the salmon, skin side down, on the grill, closed the top and let the smoke box do its thing.

Salmon, Zucchini and Mr. Smoke Box on the Grill
When the salmon was about half-way cooked, Billy quickly flipped it (have to get those perfect grill marks!) then shut the grill again in order to keep as much smoke in the grill as possible.
The fish was amazing. It was cooked perfectly, thanks to Billy of course, and had a subtle smoked flavor. Conclusion about the smoke box experiment: awesome deliciousness! We thought that maybe letting the food cook low and slow may give it more of a traditional smoked flavor, but the box is perfect for infusing food with a great smoky flavor. We served the salmon with grilled zucchini and quinoa (instead of rice or potatoes).

This was also our first time trying quinoa. It was…interesting. The texture was pretty close to rice, but it had a small bite to it. It didn’t have much flavor on it’s own, but we tried to boost it up with some salt, pepper, chili powder and lemon zest. Definitely will be using it again, but will need more flavoring ideas…anybody have some they’d like to pass along?
I’m not a huge fan of steak. I know what you’re thinking — “than why am I reading a blog post about steak kabobs?” — but the truth is, it’s just that I don’t think there are enough variations for cooking steak. Billy loves steak (well, all meat really) and I get burnt out with it pretty easily, so we try to come up with different ways to cook it so it’s not the same all the time. Let me just say that these were probably the best kabobs I’ve ever eaten.
The awesome thing about kabobs of any kind is that they’re really simple to make (well, put together really) and quick, too. You can use any variety of vegetables you like, as long as they’ll hold up on the grill, and any kind of meat…including most shellfish. For our kabobs, we used two colors of bell peppers, onions and steak. All we did to assemble them is cut everything into equal sized pieces so they all cooked in the same amount of time. (Make sure if you’re using wooden skewers to soak them in water for at least 20 minutes so they don’t burn up on the grill.) My personal preference for assembly is pepper, onion, steak, pepper, onion, steak, etc. After the skewers were assembled, we seasoned everything with salt, pepper and garlic powder. That’s it…simple as that.

Kabobs Grilling Away
Sometimes I think it’s funny — and kind of ironic — how some of the simplest meals can be the best tasting. There’s something to be said about few ingredients and little work, I guess. If you’re a kabob fan, let me know about some of your favorite combinations!
On Saturday the whole fan-dam-ly got together at my great-grandma’s for a little swimming and a good old fashioned summer BBQ. The early afternoon snack menu consisted of homemade salsas, three ways, using fresh tomatoes from our garden (you know, the million a day that we get have to go to some good use!), an Italian antipasto salad, and some cheese and crackers (along with lots of alcohol, haha).
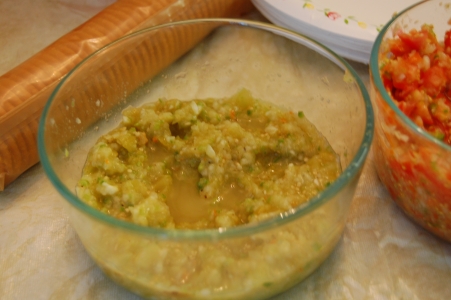
Billy and I made regular red salsa with tomatoes, onions, jalapenos, and a half of a habanero pepper; a green salsa with roasted tomatillos, onions, jalapenos, and the other half of a habanero; and a chili con-queso with green chili, onions, and tomatoes (and of course cheese). The green salsa was the hottest of the three, but equally delicious. It was more blended than chunky so it was perfect for scooping up on a tortilla chip. The red salsa was really chunky and fresh tasting. It wasn’t horribly hot which made it refreshing on a hot summer way (and perfect for a swimming/BBQ snack). For the queso, we used 1/2 pound American cheese and 1/2 pound of Mexican cheese blend. It was so creamy and using the different cheeses gave it depth and a lot of flavor. It wasn’t very spicy, but the green chili gave it a great kick and flavor.

Red Salsa

Green Salsa

Queso
The dinner menu was grilled chicken made by the old-man grill master (aka, my dad), green chili rice made by my mom, and sauteed spinach made by yours truly. Nothing too special, so no recipes to share, but I thought the salsas were worth sharing. I hope you make the most of what’s left of your summer with some more good-old BBQ’s. I know we will! Until next time, happy eating. :)
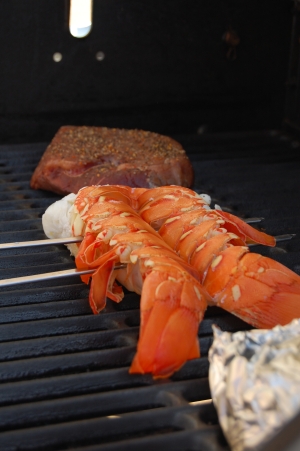
On Friday (yikes, I’m behind) we planned on making a surf-n-turf kind of meal — steak and lobster. Billy wanted to grill the steak so I suggested that we also grill the lobster tail. Oh. My. God. Best decision we made all week. We split the tail in half length-wise by flipping it on it’s back (softer side up) and splitting it down the middle with a hefty knife. If you do this, try not to cut all the way through, you want the tail to stay intact while on the grill, but it’s not the end of the world if you have two pieces instead of just one. We stuck two skewers through the butterflied tail to keep it butterflied and to prevent it from curling up during cooking on the grill.

Lobster Tail Ready for the Grill
We seasoned the lobster with salt, pepper, and a little Cayenne pepper. The steaks got the same, but also some steak seasoning. The steak and lobster went onto the grill at the same time (we like our steak medium, so if you’re cooking it to rare you might want to hold off on the lobster tail for a few) and were cooked perfectly. And that’s it!

Steak and Lobster Grilling Away
Nothing too special or out of the ordinary here, but the meal was so delicious that I had to share. The lobster tail took on a whole different flavor being grilled instead of boiled. The char from the grill gave it that classic summer-grilled taste with a little crunch on the outside, but the meat was so tender, juicy, and tasty. The steak was, well…steak, but it was cooked perfectly and very tender. (Billy gets all the credit for the grilled masterpieces. I just prepare everything and then watch him handle the grill like a pro.) I must say, if you’ve never had a grilled lobster tail, now is the time to try it.

The Finished Product
By the way, we paired the steak and lobster tail with some garlic mashed potatoes and a grilled onion. (We just peeled the onion, cut it in half, put each half in a little aluminum foil pouch with some olive oil, salt and pepper, and threw it on the grill — yum.) Until next time, happy eating!


